
Learning to play a note on the guitar comes down to a simple, two-hand coordination. It’s all about pressing a string down to a metal fret with one hand while striking that same string with a pick or your fingers with the other.
This single, coordinated movement is the foundation for every note, chord, and melody you will ever play.
Welcome to one of the most exciting moments for any new guitarist—making your first note ring out. It's that "aha!" moment when the instrument starts feeling less like a piece of wood and more like an extension of your musical voice.
Before we get into the nitty-gritty, we need to cover the absolute basics. Think of it as your pre-flight check before taking off. The goal isn't to memorize every single part of the guitar right now, but to grasp the crucial relationship between your hands, the strings, and the fretboard.
Whether you have an acoustic or an electric, these core principles are exactly the same. By the way, if you're still figuring out which instrument is for you, our guide on how to choose the right guitar can be a huge help, as different models can really affect how the guitar feels for a beginner.
First things first, your guitar has six strings, and each one has a specific name and number. Think of this as your musical alphabet—knowing it is non-negotiable for finding your way around.
We number them from the thinnest string (String 1) to the thickest (String 6). Here’s a quick reference table to get you started.
This table shows the name and number for each open string, starting with the thickest one closest to your chin.
| String Number | Note Name (Pitch) | Common Mnemonic |
|---|---|---|
| 6 | E (Low) | Eddie |
| 5 | A | Ate |
| 4 | D | Dynamite |
| 3 | G | Good |
| 2 | B | Bye |
| 1 | E (High) | Eddie |
That classic mnemonic, "Eddie Ate Dynamite, Good Bye Eddie," is a simple and effective way to lock these string names into your memory for good.
As a guitar instructor, I've seen this concept click for countless students: pressing a string against a fret shortens its vibrating length, which in turn raises its pitch. That simple physical action is how you'll create every note you play.
This is exactly where millions of new players begin. In fact, the pandemic years saw an explosion of 16 million new guitar learners in the U.S. alone. This boom was powered by accessible digital learning tools that make these first steps—from making a sound to playing a real melody—easier than ever.
Your journey from silence to sound is just a few steps away. With a little guidance and practice, you'll be making clean, confident notes in no time.
Alright, you know how strings and frets work to change notes. Now comes the fun part: getting your hands to work together. This coordination is what separates a buzzy, fumbled sound from a clean, ringing note. It's really a two-part conversation—your fretting hand sets the stage, and your picking hand makes the music happen.
The whole process is a simple sequence: find the string, press the note, and pick it. That’s it.
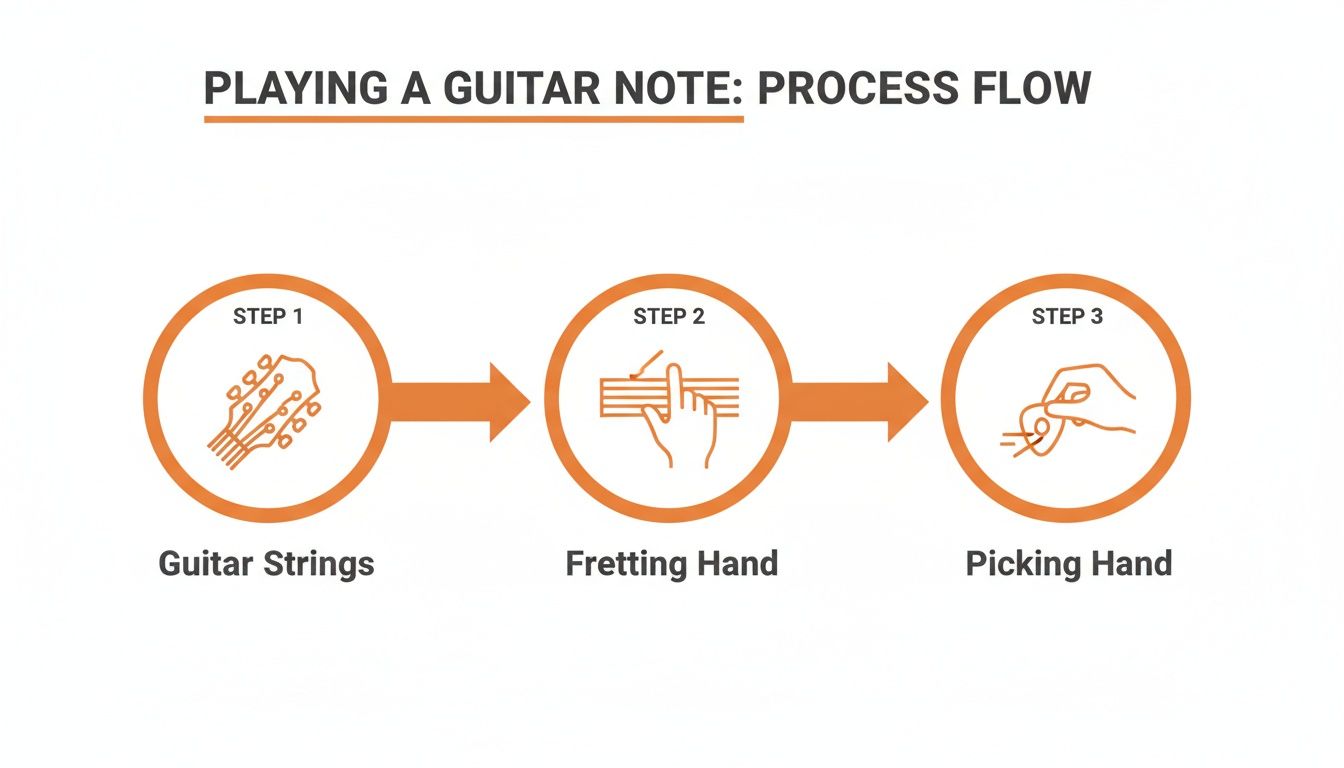
This little diagram breaks down what feels like a complex task into three clear, physical actions. Let’s tackle each hand one by one.
Your fretting hand—the one on the neck—is all about clarity and precision. The number one complaint from new players is that dreaded buzzing sound, and nine times out of ten, it’s all about where and how you’re pressing the string.
To get a crystal-clear note every time, burn these three rules into your brain:
Let’s put this into action. Grab your guitar and find the thickest string (that's your low E). Now, use your index finger to press down on the third fret. Check your form: Are you using the tip? Are you right behind the metal? That note you're holding is a G.
If there's one thing to take away from my years of teaching, it's that economy of motion is everything. The goal is to get the best sound with the least effort. Nailing this now prevents fatigue and builds the foundation for speed down the road.
For a deeper dive, there are some fantastic resources out there for developing your left-hand form and building that crucial finger strength.
While your fretting hand is busy choosing the notes, your picking hand is the one giving them a voice. How you hold and use your pick has a massive impact on your tone, rhythm, and overall sound.
First, get your grip right. Hold the pick between the pad of your thumb and the side of your index finger. It should feel secure, but not like you're trying to choke it. Just a little bit of the pick's tip should be showing.
Now, let's talk motion. When you strike a string moving toward the floor, that’s a downstroke. When you move back up toward the ceiling, that’s an upstroke. Simple enough, right?
The real secret to smooth, efficient playing is alternate picking—consistently alternating between downstrokes and upstrokes. Making this a habit from day one will save you a world of headaches later on. It builds a rock-solid rhythmic foundation and stops bad habits before they even start.
Let's try it. Go back to that G note on the third fret of the low E string. Hold it down, and then pick the string slowly and steadily, alternating your pick direction: down, up, down, up. Your main goal here is to make every note sound just as loud and clear as the one before it. This simple drill is the key to syncing up your hands and building the muscle memory you’ll rely on forever.
At first glance, the guitar fretboard can feel like a total mystery—a confusing jumble of wires and dots. But here's the good news: it's not random at all. It’s actually a perfectly logical map. Once you crack the code, you'll know exactly how to find any note you want, anywhere on the neck.
The entire system is built on something you probably already know: the musical alphabet. It only has seven letters: A, B, C, D, E, F, and G. That's it. After G, it just starts over again at A, but one octave higher.
These notes are laid out in specific intervals called half-steps and whole-steps. This concept is the absolute key to unlocking the fretboard.
The relationship between the natural notes is almost always a whole-step, but there are two crucial exceptions you need to memorize: B to C is a half-step, and E to F is a half-step.
With this simple formula, you can find any note just by starting from an open string and counting your way up the frets.
Let’s try a real-world example. Go to your 5th string—that's your A string. Let’s say we want to find a C note on that string. Here’s how you do it:
And there it is—the C note is on the 3rd fret of the A string. You can use this exact same process to find any note on any of the six strings.
Those dots on your fretboard? They're not just for looks; they're your road signs. These fret markers are usually at the 3rd, 5th, 7th, 9th, and 12th frets. The 12th fret, which marks the octave, almost always has two dots to make it stand out.
These markers are your visual shortcuts so you don't have to count from the open string every single time. They help you get your bearings on the neck instantly, which is absolutely essential when you start playing melodies and solos at a faster pace.
As a teacher, my number one piece of advice for really getting a handle on the fretboard is this: start by memorizing the notes on the two thickest strings (the low E and A strings). Why? Because a massive number of chords and scales are built using root notes found on these two strings.
Once you know these notes cold, you can use simple octave shapes to find the same note all over the fretboard. This one skill changes everything. It turns the fretboard from a puzzle you have to solve into a playground you can explore with confidence. If you want to go deeper, you can learn more about developing fretboard knowledge and start making those crucial connections across the entire neck.
Okay, so you can find notes on the fretboard and get them to ring out cleanly. Awesome. But now we get to the fun part—turning those individual notes into actual music. This is where you learn the language that tells you what to play and when to play it. Forget about those intimidating dots and lines of standard music notation for now. We’re starting with every guitarist’s best friend: guitar tablature, or just "tab."

Tab is a wonderfully simple system built just for guitar players. It’s basically a map of your fretboard. You'll see six horizontal lines, with each one representing a string on your guitar. The line at the very top is your thinnest string (the high E), and the one at the bottom is your thickest string (the low E). It’s like looking straight down at your guitar while you're holding it.
The numbers on those lines tell you which fret to press. A "0" means to play that string open—no fretting needed. A "3" means you press down on the 3rd fret of that string. That’s pretty much the gist of it.
Let's get this under your fingers with a tune everyone knows: "Twinkle, Twinkle, Little Star." This melody is perfect for connecting what your eyes see on the tab to what your hands are doing on the fretboard.
Here's how the first line looks in tab:
e|-----------------|
B|-----------------|
G|-----------------|
D|-0-0-7-7-9-9-7---|
A|-----------------|
E|-----------------|
See how all the action is on the D string (the fourth line from the bottom)? You'll start by picking the open D string twice. Then, slide your hand up to the 7th fret and pick it twice. Next, move to the 9th fret for two picks, and finally, come back to the 7th fret for one last note.
As you work through this, really focus on making each note sound distinct and letting it ring out. This simple exercise pulls together everything we've talked about: finding your way around the fretboard, proper fretting, and clean picking.
It's no surprise that the amateur category is the fastest-growing part of the acoustic guitar market. Beginners want instruments that are easy on the fingers, and they want to learn songs fast. In fact, the global guitar market is expected to hit $23.20 billion by 2033. This boom is why simple learning tools like guitar tabs are so crucial. You can read the full research about the acoustic guitar market to see just how big this trend is.
Playing the right notes is only half the story. When you play them is what gives music its pulse. Your sense of rhythm is everything, and building a solid internal clock is a non-negotiable skill for any musician.
The easiest way to get your timing rock-solid is to make friends with a metronome. It gives you a steady click that doesn't lie.
Let's be real for a second. Jaw-dropping progress on the guitar doesn't come from a heroic, three-hour practice session you manage once a week. It comes from showing up, day in and day out. Building the habit of just picking up your guitar every single day—even for just 15 minutes—is infinitely more powerful than those rare, marathon practices.
That consistency is what builds real muscle memory. It keeps all the concepts we've been talking about fresh and at your fingertips, turning practice from a chore into a deeply rewarding part of your day. This is how you build real, tangible skill and blow past those frustrating plateaus.
I get it, life is busy. That's why this routine is designed to slot into even the most packed schedule. We'll break it down into three simple, five-minute blocks, each with a crystal-clear purpose. If you stick with this, you're guaranteeing that you're hitting all the core skills needed to play single notes cleanly and with confidence.
Here’s a simple routine to get you started on a daily practice that actually works.
This structured daily routine is your secret weapon for improving single-note playing. It’s designed to target your technique, coordination, and the all-important bridge to making real music. Just follow these blocks every day.
| Time Block | Activity | Goal |
|---|---|---|
| Minutes 1-5 | Warm-Up & Gentle Stretching | Get the blood flowing and prepare your hands to play, preventing strain. |
| Minutes 5-10 | Technical Drill (e.g., Spider Walk) | Build finger independence, strength, and that crucial hand-to-hand coordination. |
| Minutes 10-15 | Musical Application (e.g., C Major Scale) | Put your technical skills to work in a genuinely musical context. |
By dedicating just a few focused minutes to each area, you cover all your bases without feeling overwhelmed. It's a small investment with a huge payoff.
So, what do you actually do in each block?
For the first five minutes, it's all about the Warm-Up. We're not trying to play anything complex here. Just do some gentle finger stretches—flex and extend your fingers to get the blood moving. You can also play some simple, slow patterns up and down a single string to wake up your hands and get them ready for what's next.
The next five minutes are for a dedicated Technical Drill. A timeless and incredibly effective one is the "spider walk." You simply place one finger on each of the first four frets of one string (index on 1, middle on 2, ring on 3, pinky on 4). Then, slowly and deliberately, move that entire four-finger shape up the neck, string by string, making sure every single note rings out true. This is a powerhouse for building finger independence.
Finally, the last five minutes are for Musical Application. This is where we stop doing "exercises" and start making music. Go back to that simple "Twinkle, Twinkle, Little Star" melody we learned, or spend the time internalizing the sound and feel of a C major scale.
Here's the most important part of this whole thing: you have to listen to yourself. Is every note clean? Is there any fret buzz? Are you picking with a consistent attack? Is your timing steady? That kind of self-awareness is what separates aimless noodling from truly effective practice.
This simple, repeatable framework gives you the structure you need to make consistent gains, day after day.
Alright, you've officially built a solid foundation. Getting a clean, clear single note with good timing is a huge milestone, and you should be proud of conquering one of the biggest hurdles for any new guitarist.
So, where do you go from here? The next part of the journey is all about taking those single notes and starting to combine them into richer, more complex sounds. It's an incredibly exciting phase where the guitar really starts to open up.
The most natural next step is to try playing two notes at the same time. In the guitar world, we call these double-stops, and they are everywhere in rock, blues, and country music. Think of them as a way to thicken up your melodies without having to tackle a full-blown chord just yet. They're that perfect sweet spot between a single-note line and a chord.
Once you get comfortable with double-stops, you're ready to dip your toes into chords and scales.
A chord is just three or more notes played together. Don't let that intimidate you; there are plenty of simple, three-string chord shapes that are perfect for beginners. If you're itching to start strumming some tunes, you can actually learn how to play thousands of songs with just four easy guitar chords.
At the same time, it's a great idea to start exploring scales. If individual notes are the letters of the alphabet, scales are the words you use to build musical sentences. They're the framework that helps you create riffs and solos that actually sound like music, not just a random collection of notes.
As a music educator, I can't stress this enough: a structured path is essential for progress. Randomly jumping between lessons online often leads to frustration and gaps in your knowledge. Having a clear roadmap makes all the difference.
The perfect place to start is with the minor pentatonic scale. This five-note scale is hands-down the most important and widely used scale in all of popular music. Seriously. Its pattern on the fretboard is simple and easy to memorize, and it sounds incredible over countless rock and blues tracks. Learning this scale is a rite of passage for every guitarist—it's what unlocks the door to improvisation.
Navigating from single notes to chords and scales is where a guided learning system really proves its worth. It ensures you’re learning the right things in the right order, building your skills logically instead of just grabbing random bits of information. This is precisely why platforms with curated learning paths are so effective for aspiring guitarists.
To keep your momentum going and follow a clear, structured path from world-class instructors, I highly recommend exploring a TrueFire All Access trial. It gives you the roadmap, tools, and thousands of lessons you need to become the guitarist you’ve always wanted to be. Learn more at https://truefire.com.
